Metallic Epoxy Floor: DIY Guide, Cost & Tips
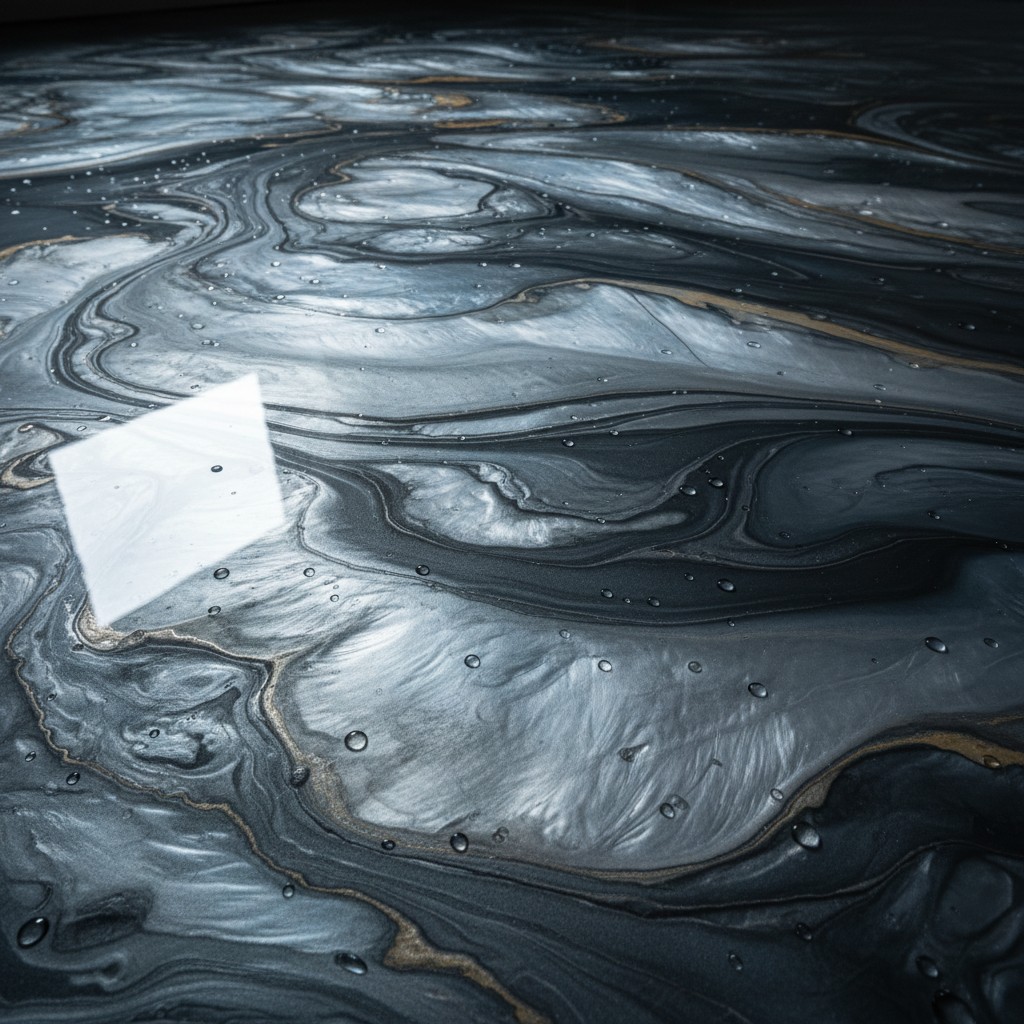
Metallic epoxy floors are the showstopper of the garage coating world. While standard flake floors look clean and professional, a metallic epoxy creates a one-of-a-kind, swirling, three-dimensional appearance that looks like liquid metal, marble, or flowing water frozen in place. Every metallic floor is unique because the patterns are created by the natural movement of metallic pigments through the coating as it cures.
This guide covers everything you need to know about metallic epoxy floors — from what they are and what they cost, to a full step-by-step application process and honest advice on whether a DIY metallic floor is right for you. If you need to estimate how much material to buy, start with the epoxy floor calculator.
What Is Metallic Epoxy?
Metallic epoxy is created by mixing metallic pigment powders into a clear base coat — typically a 100% solids epoxy or a polyaspartic resin. The metallic pigments are extremely fine particles of mica or synthetic metallic powder that reflect light and create depth. When the pigmented mixture is spread on the floor, the particles settle, shift, and orient themselves in different directions as the coating flows and cures, creating the distinctive swirling, pearlescent, three-dimensional effect.
Unlike standard colored epoxy where the pigment is uniformly distributed, metallic pigments are deliberately left in a semi-suspended state. The applicator then uses tools — spike rollers, leaf blowers, or even just carefully timed back-rolling — to create movement in the wet coating. This movement pushes the metallic particles into patterns that become permanent as the coating cures.
Popular metallic colors include silver, copper, pearl white, gunmetal gray, ocean blue, and bronze. Many installers combine two or three complementary metallic pigments in the same pour for more complex, layered effects. The clear base coat allows light to penetrate into the film and reflect off the metallic particles at different depths, which is what creates the striking 3D appearance that photographs never quite capture.
Metallic epoxy floors are used in garages, basements, showrooms, retail spaces, restaurants, and even residential living areas. They are a genuine conversation piece — visitors will ask about your floor.
Metallic Epoxy Cost
Metallic epoxy is significantly more expensive than standard flake epoxy, both for DIY and professional installation. The metallic pigments themselves are costly, you need a clear (not pigmented) base coat, and the application technique requires more material because you cannot go back and touch up thin spots without creating visible seam lines.
| Category | Cost per Sq Ft | 2-Car Garage (400 sq ft) |
|---|---|---|
| DIY Metallic Epoxy | $4 - $8 | $600 - $1,200 |
| Professional Installation | $8 - $15 | $3,200 - $6,000 |
| Standard Flake Epoxy (for comparison) | $2 - $4 DIY | $250 - $550 |
The DIY material cost for a 2-car garage metallic floor typically breaks down as follows: primer ($60-80), clear 100% solids epoxy base (2-3 gallons at $80-100/gal = $160-300), metallic pigments (8-12 oz at $15-25/oz = $120-300), clear top coat ($90-120), and application tools ($60-80). For a detailed look at coating costs across all types, see the garage floor epoxy cost guide.
Materials Needed
Metallic epoxy uses different materials than a standard flake system. Make sure you have everything before you start — once you mix the metallic base, there is no time to run to the store.
Coating Materials:
- Primer: Epoxy or polyaspartic primer (same as standard systems). This is the adhesion layer between concrete and the metallic coat.
- Clear base coat: 100% solids clear epoxy or clear polyaspartic resin. Must be crystal clear — any tint in the base will mute the metallic effect. Budget 2-3 gallons for a 2-car garage at 100-160 sq ft coverage per gallon.
- Metallic pigment powder (check price): 2-4 ounces per gallon of base coat. More pigment = more intense color and less transparency. Less pigment = more subtle, translucent effect. Buy extra — you can always use less but running out mid-pour is catastrophic.
- Clear top coat: Polyaspartic clear recommended over epoxy clear for UV stability and scratch resistance. The top coat is what gives the floor its glossy, glass-like depth.
- Denatured alcohol (optional): Spraying or dripping denatured alcohol onto the wet metallic coat creates dramatic "craters" or "cells" in the pattern, similar to the effects in acrylic pour painting.
Application Tools:
- Notched squeegee (1/8" notch): Used to spread the metallic base at a consistent thickness. A flat squeegee works but notched provides better control.
- Spike roller: Rolled through the wet metallic coat to create movement and release trapped air bubbles. Use spiked shoes to walk on the wet surface.
- Leaf blower (optional): A leaf blower aimed at the wet surface from 2-3 feet away creates dramatic organic swirl patterns. This is the "secret weapon" for stunning metallic floors.
- Mixing drill with paddle: For thoroughly dispersing the metallic pigment in the clear base. Mix for at least 3 minutes.
- 5-gallon buckets: Multiple buckets — you will mix in batches.
- Safety gear: Respirator with organic vapor cartridges, chemical-resistant gloves, safety goggles, and long sleeves.
Step-by-Step Application
Before starting the metallic coat, your floor must be fully prepped and primed. Surface preparation for metallic epoxy is identical to standard epoxy — clean, degrease, repair, and profile the concrete. See the complete prep guide for detailed instructions.
1. Prime the floor. Apply your chosen primer coat to the prepped concrete. Roll or squeegee it evenly across the surface. Allow it to cure fully — 12-24 hours for epoxy primer, 4-6 hours for polyaspartic. The primer creates a sealed, consistent base that the metallic coat will flow over evenly. Without primer, the metallic base can absorb unevenly into the concrete, creating blotchy areas.
2. Mix metallic pigment into the clear base. Add 2-4 ounces of metallic pigment powder per gallon of clear base coat. Mix thoroughly with a drill and paddle attachment for at least 3 minutes. The pigment must be fully dispersed — any clumps will show as concentrated color spots on the finished floor. If using multiple colors, you can either pre-mix them together or add them separately to different batches for a more varied, layered look.
3. Pour and spread with squeegee. Pour the metallic mixture onto the primed floor in a ribbon pattern (back and forth across the width of the space). Immediately spread with your notched squeegee, working in sections of 50-100 square feet. Maintain a wet edge — if a section starts to set up before you merge it with the next pour, you will have a visible seam line. Work efficiently but do not rush; the goal is even, consistent thickness.
4. Create movement with roller or blower. This is where the magic happens. While the coating is still fully wet and mobile, use your chosen tool to create patterns in the metallic pigments:
- Spike roller: Roll through the wet coating in long, overlapping passes. The spikes create subtle waves and directional flow. Change direction between passes for a more complex pattern.
- Back-roller (standard 3/8" nap): Creates gentler, more uniform movement. Good for subtle, elegant effects.
- Leaf blower: Hold 2-3 feet above the surface and sweep across the wet coating. Creates dramatic, organic swirl patterns that look like flowing water or marble veining. This is the technique behind the most striking metallic floors.
- Denatured alcohol drip/spray: Spraying or dripping denatured alcohol onto the wet metallic creates "cells" — circular patterns where the alcohol pushes the metallic pigment outward, creating a cratered, organic effect.
5. Let it cure. Once you are satisfied with the pattern, stop manipulating the surface. Any movement after the coating begins to gel will create rough texture instead of smooth patterns. Walk away and let it cure completely — 12-24 hours for epoxy base, 4-8 hours for polyaspartic.
6. Apply clear top coat. The top coat seals and protects the metallic layer. Apply with a roller in thin, even passes. Do not overwork it — heavy rolling can pull up metallic pigment from the base layer if it is a polyaspartic base that has not fully cured. A polyaspartic clear top coat is strongly recommended over epoxy clear because it will not yellow and provides superior scratch resistance. Allow 24-48 hours before foot traffic and 72 hours before vehicles.
Technique Tips
The difference between an amateur metallic floor and a professional one comes down to technique. Here are the details that matter:
- Direction of roller passes matters enormously. Each pass of the spike roller or back-roller pushes metallic pigments in that direction. Uniform, parallel passes create a flowing river effect. Random, multi-directional passes create a more chaotic, organic look. Decide on your pattern before you start and commit to it.
- The leaf blower is powerful — start gentle. Begin from further away (3-4 feet) and gradually move closer. A blast of air from 12 inches away will blow the coating into a thin spot surrounded by thick ridges. Start with a gentle, sweeping motion and increase intensity if you want bolder swirls.
- Work in sections, but keep the wet edge alive. For a garage, work in lanes from back to front. Each lane should be mixed and poured as a separate batch, but you must merge with the previous lane while both are still wet. Having a helper is almost mandatory for larger spaces.
- Temperature matters more than with standard epoxy. The metallic effect depends on the pigments having time to move and settle. If the coating cures too fast (high temperature, low humidity), the pigments freeze in place before forming patterns. Aim for 60-85°F ambient and concrete temperature. Below 60°F, the coating may be too thick to pattern; above 85°F, it sets up too fast.
- Humidity below 60% is important. High humidity can cause blushing (a milky, hazy appearance) in clear base coats, which ruins the depth effect that makes metallic floors special.
- Mix more material than you think you need. Running out of metallic base mid-floor is the worst-case scenario. A new batch will never perfectly match the color intensity and pigment distribution of the first batch, creating a visible seam. Buy 10-15% more material than your calculated need.
DIY Difficulty Rating
Let's be honest: metallic epoxy is one of the hardest garage floor coatings to DIY successfully. On a difficulty scale of 1-10 (where standard flake epoxy is a 4), metallic epoxy is an 8. Here is why:
- No second chances. With flake epoxy, minor roller marks and thickness variations are hidden under the flake broadcast. With metallic, every imperfection is visible and amplified by the light-reflecting pigments. Roller marks, squeegee lines, thin spots, and lap marks are all permanently captured in the finish.
- Pattern control is unpredictable. You can influence the pattern, but you cannot fully control it. The metallic pigments respond to gravity, air movement, temperature, and even subtle variations in floor flatness. The floor you get might not match the floor you envisioned — and that is OK, as long as you accept it before you start.
- Color matching between batches is difficult. If you mix two separate batches of metallic base, the pigment intensity will be slightly different. On a reflective metallic surface, that difference is visible.
- Mistakes are expensive to fix. If you do not like the result, you cannot simply roll another coat over it. You would need to sand or grind the surface and start over with fresh material — essentially doubling or tripling your material cost.
Our recommendation: Practice on plywood or a large piece of cardboard first. Mix a small batch of metallic base and experiment with different tools and techniques on a test surface. This $30-50 investment in practice material can save you hundreds in mistakes on the actual floor. If after practicing you feel confident in your technique, proceed. If not, this is one floor type where hiring a professional is genuinely worth the premium.
For a comparison of coating types that might be easier to DIY, check our epoxy vs polyurea guide.
Popular Metallic Floor Styles
The color and technique you choose sets the tone for the entire space. Here are the most popular metallic floor styles and where they work best:
Silver / Gray: The most popular metallic floor color by a wide margin. Silver metallic creates an industrial, modern look reminiscent of polished stainless steel or liquid mercury. It coordinates with virtually any garage wall color, complements stainless steel tool chests and workbenches, and hides dust and tire marks better than darker metallics. Silver pairs well with gunmetal or charcoal accents for a two-tone effect.
Copper / Bronze: Warm metallic tones that create a rustic, inviting feel. Copper and bronze metallic floors are popular in workshops, man caves, and garages that double as entertaining spaces. The warm tones work especially well with wood accents — reclaimed wood shelving, butcher block workbenches, and wood-paneled walls. Be aware that copper/bronze is less forgiving of dust and imperfections than silver — every speck is visible against the warm background.
Pearl White: Clean, bright, and modern. Pearl white metallic creates a gallery-like space that makes the garage feel larger and brighter. It is the most dramatic transformation possible — from gray concrete to a gleaming white surface with subtle, opalescent depth. The downside is maintenance: every oil drip, tire mark, and dust bunny is visible. Pearl white is best for showroom garages, clean workshops, or spaces where the car is as much decoration as transportation.
Ocean Blue / Teal: A bold, statement-making choice that creates a striking, high-end look. Blue metallic floors are popular in sports car garages, themed spaces, and commercial showrooms. The deep blue with metallic highlights can look like tropical water, swirling galaxies, or polished gemstone depending on the pigment blend and technique. This is the most visually dramatic option but also the hardest to live with if you tire of the color — it dominates the space entirely.
Custom blends: Many installers combine two or three metallic pigments for unique effects. Charcoal + copper creates a dramatic dark/warm contrast. Silver + pearl creates subtle, elegant shimmer. Blue + silver evokes an aquatic or celestial feel. The beauty of metallic epoxy is that every floor is truly one of a kind — the exact same materials applied by a different person on a different day will produce a completely different pattern.
Related Reading
- Epoxy Floor Calculator — Estimate materials for your metallic epoxy project
- Garage Floor Epoxy Cost Guide — Full pricing breakdown for all coating types
- How to Prep Your Garage Floor — Essential surface prep before any coating
- Epoxy vs Polyurea — Compare base coat chemistries for your metallic floor